- Webflow vs WordPress: Why Migrate?
- Step 1: Define the Starting Point
- Step 2: Take Care of the Theme
- Step 3: Do the Export from Webflow
- Step 4: Do the Import to WordPress
- Step 51: Check the Permalinks
- Step 6: Do the SEO Checklist
- Step 7: Act like a QA
- Step 8: Change the Nameservers
- Step 9: Maintaining WordPress
- FAQs
- Webflow to WordPress Migration Final Note
Last Updated on April 22, 2023 by Ewen Finser
Okay, so here you have the task of migrating a website from Webflow to WordPress. Like any migration, it may become hectic at one moment, but step-by-step management and an eye for detail will help you accomplish the thing in no time.
What should you consider when moving a project from Webflow to WordPress?
In short: a lot can be done through an export-import scenario, but many require special attention and manual handling. Years of work in project management, especially with CMSs, helped me develop a checklist that I gladly share.
Webflow vs WordPress: Why Migrate?

You might already have an answer to this question. Yes, the main reason website owners migrate to WordPress from other Content Management Systems (or CMS) is the creditability of one of the oldest services. There is a common belief that it is cheaper to maintain a web project on WordPress than on any other platform, be it an e-commerce shop or a news resource.
An endless catalog of plugins, including really stable and powerful ones (like Yoast SEO), is created to replace a development team and make the service as user-friendly as possible. In most cases, WordPress does not require special knowledge of PHP, coding, or CSS.
However, juggling with plugins might lead to a limitation that we will discuss further, and custom block editors like Webflow eliminate this concern.
Webflow is a solution designers especially love for an interface built on layers, similar to that of Figma or Adobe Photoshop. Webflow handles JavaScript in a smoother native way, while it still requires some hocus-pocus for WordPress to animate static HTML. Webflow works excellently for portfolio websites, landing pages, and simple blogs. Nevertheless, the application of custom features and scaling, in general, can challenge even the most loyal adepts of the latter service.
One of the most dramatic misconceptions I encounter while working in web development is that migrating to a CMS with higher capabilities is more effective than handling the existing legacy. Cleaning the window with an old frame still requires less effort than installing a new one.
All CMS are frameworks designed for low to mid-scale web projects and will not work correctly with networks, multi-project entities, or thousand-item shops without investing in PRO versions of plugins and additional coding and development support.
Are you ready for that? Great, let’s look at the steps needed for a smooth Webflow to WordPress migration!
Step 1: Define the Starting Point

Exporting data from Webflow differ if you’re using a free or a paid plan. Paid plans for Webflow start at $19 per month if billed annually and allow access to the complete source code for the website. It helps to export your project as a whole but does little use when migrating to WordPress. A lot of work will be done manually, so make sure you have control over each part of it.
When migrating from Webflow to WordPress, answer the following questions:
- Are you keeping the core elements, such as design and structure, or would you like to implement changes as you migrate?
- Is your hosting the same, or do you plan to go with a new one as you change?
- Is your project a webshop?
Ideally, you would like to change the CMS, in other words, the engine of your project, without bothering to re-design and adjust the structure. Minor corrections like content or colors will not affect the process, but accepting significant changes along with migration will. However, since you will not be able to transfer the design from Webflow, a moment when you need to update your UI is also a perfect moment to migrate.
Although WordPress is a free CMS, the hosting will require payment and setup. If you were using Webflow hosting before, you would need to arrange another hosting service for your new site.
There are shared hosting solutions for simple WordPress sites like Bluehost, Hostwinds, or One.com, where the WP setup is part of the admin panel. Don’t rush in to change the domain nameservers; develop the WordPress version of the site on a subdomain instead. We will change this in the last step.
When you are ready to migrate, do a reserve backup in Webflow. To do that, push Command + Shift + S (on Mac) or Control + Shift + S (on Windows).
What to consider: The export and import process will also be different for a webshop. Product pages and blocks cannot be imported to WordPress automatically, so we’ll take a look at the workaround in a few more steps.
Step 2: Take Care of the Theme
Although with a paid Webflow plan, you can export your theme’s CSS and HTML naturally, once again, it doesn’t help the WordPress migration. WordPress tends to wrap the HTML of your pages into bizarre classes, so you can use the original CSS for a child file and combine it with the theme file.
Typically developers find templates that allow full customization and then apply the changes – either through the CSS and the theme code – or through the UI building features of WordPress, such as Elementor or Gutenberg Blocks. Others advise building a template according to the original design. WordPress is not famous for incredible design features, but you will be surprised that many seriously cool design blogs are built on it, like Adobe’s webzine 99u.
Most of the design elements will be able to set up by accessing Appearance – Customize. Some themes also The structural components of the site, like the navigation menus, the header, and the footer, are to be set up manually. Go to Appearance – Menus and Widgets to handle that step. If the functionality looks limited to you, download a plugin that will add flexibility to your menus and widgets.
Once you’ve decided how to migrate the design – congratulations! You passed the most challenging part.
What to consider: The design migration from Webflow to WordPress can be elaborate. Webflow is a design-centered service that creates various adaptive designs and operates with layers of design components. WordPress does not allow adaptive customization from the admin panel and handles mobile resolutions directly from the theme CSS files. Don’t expect your UI to be as fluent as in Webflow – WordPress just isn’t made for that.
Step 3: Do the Export from Webflow
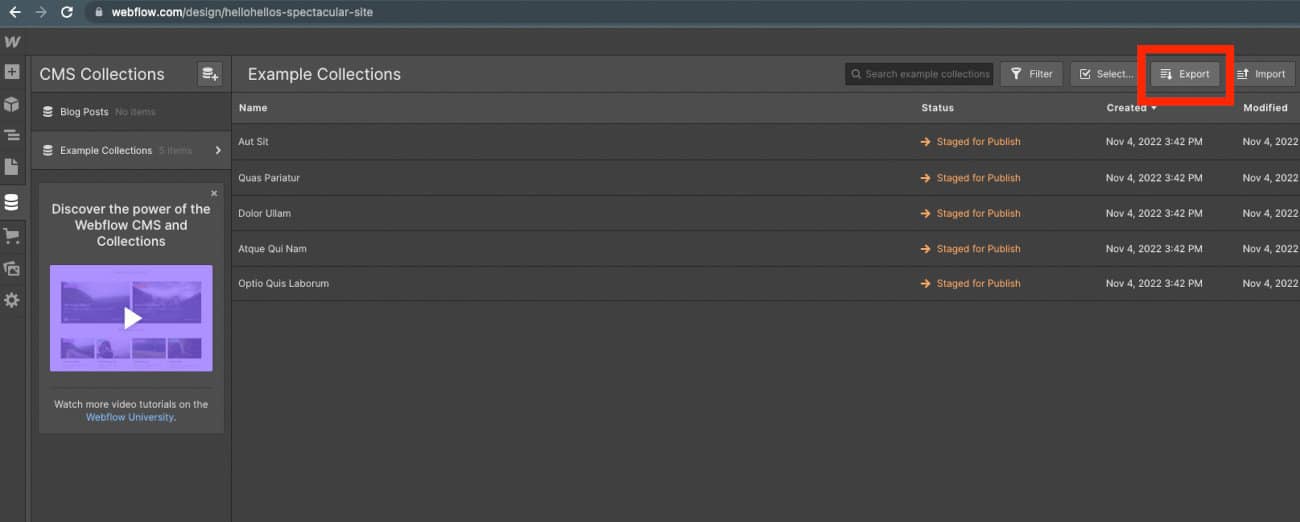
Before exporting from Webflow, ensure your project is distributed as a CMS collection. It allows database structure and buckles up content and roles in your project. Landing pages, blog posts, authors, categories, and recipes are examples of collections for a cooking blog. WordPress handles that stuff automatically, and you don’t want to manually fill in what can be done with the help of an excel file.
To create a collection export from Webflow, click the CMS icon on your left panel, and push the Export button. Your data will be exported as a CSV file. For products, go to the Ecommerce section in the same navigation panel, and export your data from there.
You might want to run a sitemap crawl for your Webflow site to see if the export matches. A sitemap is a file for search engine robots to know the exact structure of the website and not miss any page. In situations like these, it comes handy even for a human.
What to consider: Most of your assets of Webflow can be exported with a paid plan. It includes the HTML code, the CSS files, and the Javascript files. In theory, you can deploy a site with that setting to any other CMS or backend application. But not to WordPress: a little effort will be required to match the formats in the next step.
Step 4: Do the Import to WordPress
There is a set of native WordPress importers for Blogger, LiveJournal, and Tumblr, as well as for other WordPress sites. Installation of additional plugins is not necessary. In your admin panel (that looks typically like yourproject.com/wp-admin/), click Tools and Import.

The WordPress Importer, once activated, allows importing files with a .xml extension. Wait, but we had a CSV, right? So our two options would be to convert the CSV to an XML file online or download one of the Import/Export plugins, like WP All Import.
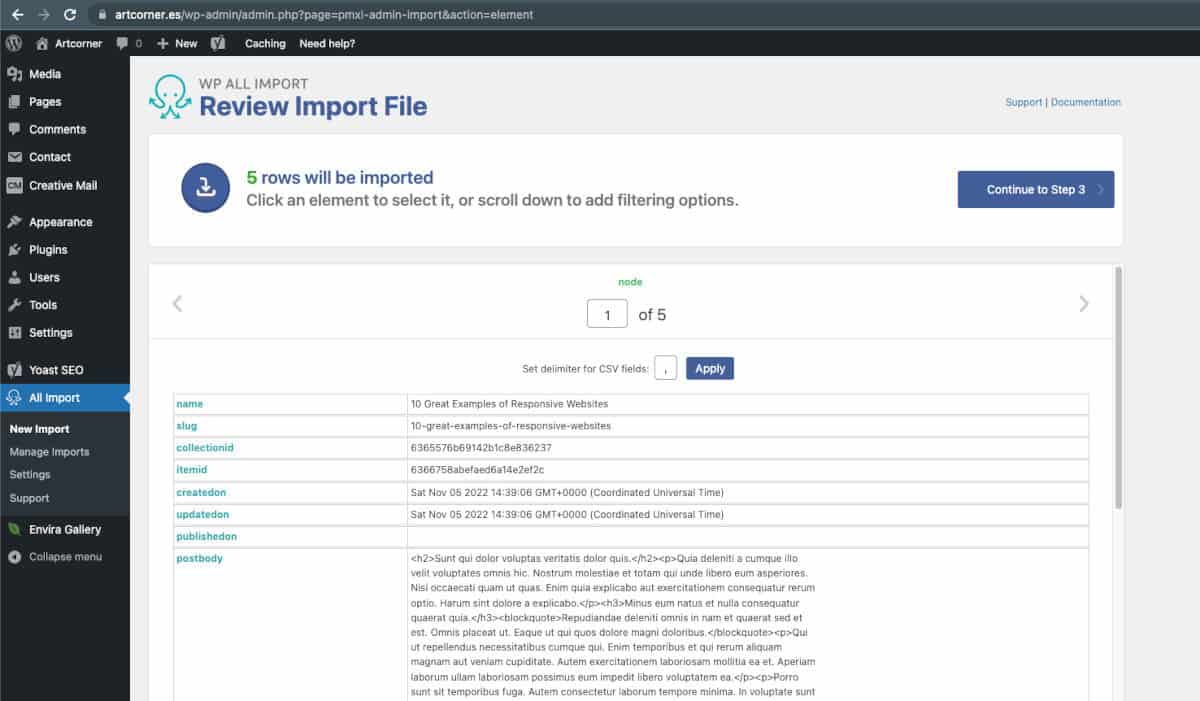
Despite the illusion that being accustomed to an import plugin is something to labor over, the process is straightforward. It only requires you to match the import fields with existing sections of a WordPress content item. Once you have done that through a drag-and-drop interface, the plugin does the import automatically.
Types of content eligible for Webflow to WordPress import include web pages, blog posts, gallery pages, texts, embedded blocks, and images. Other things, like index pages, comments to posts, audio and video files, or custom CSS, cannot be transferred automatically.
WooCommerce handles a webshop for WordPress, so when exporting your products and customer base to WordPress through a CSV file, use one of the Import plugins for WooCommerce.
What to consider: Simple content, such as web pages and blog entries, will be quickly loaded into WordPress with the help of Import plugins. But custom styles, animations, video files, and contact forms are subject to manual migration. You will need to find a plugin to handle each scenario accordingly.
Step 51: Check the Permalinks
Before making the new site live, we need to ensure two things are under control: the permalinks and the redirects. Why is it important? Each CMS has its default format for URL slugs, and during migration, we aim to avoid a 404 “page does not exist” error.
You can edit the permalinks for WordPress in two ways: first, change the permalink structure in Settings – Permalinks. Second – download a plugin that allows custom permalinks in case you need to change the slugs for the shop and the products. Wherever it is impossible to replace the old page with a new one by keeping the URL, set a 301 permanent redirect (which can also be done with a redirect plugin).
Going through the site’s existing backlinks will also be an SEO ninja measure in migration. If the backlinks lead to 404 pages, ask the site owner to replace them with new ones.
What to consider: Match the new pages with the old sitemap to ensure all old pages lead to new ones with either the same slug or a permanent redirect. Not doing so will cause undesirable issues with search engine optimization and a loss of visitors.
Step 6: Do the SEO Checklist
Transferring meta tags is also part of the manual routine when migrating from Webflow to WordPress. One of the disadvantages of WordPress is that, in very seldom cases, two plugins may correspond. Imagine the CMS structure as a giant tree and the branches as various plugins.
All of them connect with the trunk, but they don’t fit. SEO for WordPress is managed by additional plugins, although some hosting providers may even pre-install them for you. This means that even if your Import plugin discovered the old meta tags (which wasn’t that difficult, it’s Webflow that is assigning fields to the CSV file, remember?), they wouldn’t be able to handshake with the SEO plugin to transfer the data.
You will need to look for an SEO plugin with an import function or manually migrate the meta titles, descriptions, and keywords.
When you are done, run through this helpful SEO checklist and make sure you answered yes to all clauses:
- Are meta tags filled in for each page, blog post, and product?
- Are the H1 and H2 headings formatted well for each page?
- Did all images import correctly? Is the image folder slug match the old one?
Lastly, set an SSL certificate to ensure your website is opened through a secure protocol. This can be done either in the hosting service’s admin panel or through a WordPress plugin. Without a valid certificate, search engines and browsers might regard your site as a hazardous destination and block visitors from accessing it.
What to consider: Meta tags, H1 headings, and a valid SSL certificate are within the core elements to make the site seen by others. SEO during migration requires as much attention as SEO for brand-new websites.
Step 7: Act like a QA
Don’t forget to enter your new site as a regular visitor and check all pages, posts, links, navigation controls, and images to ensure nothing is broken. Send a test message using a contact form and make sure that you, as an administrator, receive it. Spend time on your site to ensure that the migration is completed.
Are you done with that?
Congratulations! Now your site is transferred to WordPress.
Step 8: Change the Nameservers
All you need to do now is to tell your domain registrar that the domain should point to your new hosting with a WordPress site on it. Change the Nameservers to the ones your new hosting provided you and make sure that the starting page appears correct in the WordPress admin panel – Settings – General – WordPress Address (URL).
Step 9: Maintaining WordPress
From now on, your site is running on a powerful and flexible platform that allows full customization and scaling. There are a few things to think about, which can be confusing if you are new to WordPress.
Getting back to that image of the CMS as a big tree, notice that the trunk (the engine) updates regularly, and the branches (the plugins) also update from time to time. Over time, some plugins may no longer be supported and stop functioning well with your version of WordPress. Make sure you go with plugins with a high review score and history to know that your tree will not suffer.
Another annoying thing for a WP administrator is spam comments and cyberattacks. Disable comments without moderation and apply a captcha for contact forms to reduce spam comments or emails. Cyberattacks are possible since it’s not at all difficult to figure out the site is WP-hosted (I already mentioned the notable class names in the source code), and the admin panel is accessed through a ./wp-admin slug. The good idea is to set a secure password for the admin panel.
Things to consider: Keep an eye on the updates of your plugins and the WordPress version, and don’t forget to install spam protections to both commenting and contact forms.
FAQs
Question: Can I transfer Webflow to WordPress?
Answer: Yes, you can. Some parts of the process are straightforward and managed through an export-import flow; others require special attention. Product pages for webshops, comments on blog posts, or video and audio data cannot automatically be transferred from Webflow to WordPress.
Question: Can I export a Webflow website?
Answer: Yes, you can. Paid plans on Webflow allow exporting the code base, including the HTML, CSS, and Javascript files. The content and structure of the Webflow website can be exported even on a free plan by exporting a Collection.
Question: Is Webflow a CMS?
Answer: Yes, it is. It’s a content manager with a very user-friendly drag-and-drop builder. Webflow is a perfect solution for custom design websites as its interface is similar to a graphics editor like Adobe Photoshop or even Figma. Another strength of Webflow is that it allows the creation of adaptive web designs for any resolution.
Webflow to WordPress Migration Final Note
Suppose you have chosen to migrate from Webflow to WordPress. In that case, you will receive a more robust and customizable engine that will contribute to scaling and attracting more visitors to your project.
On the other hand, you will need to put special care into the design and appearance that is more intuitive and professional in Webflow. The last one you cannot transfer, even if you download the code base from Webflow. So it’s almost best to move from Webflow to WordPress when you are ready to discard the old design.
Maintaining WordPress is another thing you will need to get used to, as it’s not a single-operator service – most of the functionality comes from plugins attached to the core engine. It’s essential during migration to WordPress to find the right plugins you need to run the website and ensure they are highly reviewed and supported.
Some actions require manual care, like transferring the meta tags and ensuring the permalinks match.
However, in the end, you will get a compact and easy-to-operate solution for your website, allowing scaling and third-party integrations.