
Last Updated on December 8, 2023 by Ewen Finser
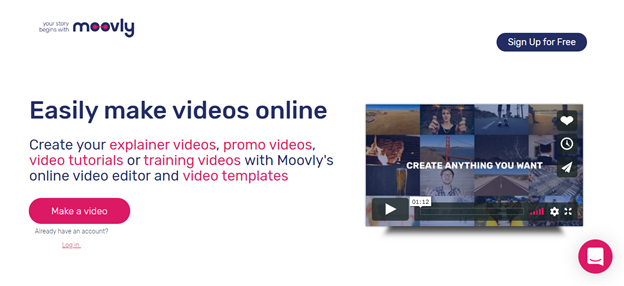
Today we’re reviewing Moovly, an online video editing tool that helps you create videos from scratch. Is the app worth it? Find out here in our Moovly review.
Did you know, 54% of shoppers say they want to see more video content from their favorite brands?
As such, the need for a decent video maker and video editor has never been greater.
So, let’s take a look at Moovly. In this article, we’ll see whether this solution really lives up to the hype.
Want to know the answer? Continue reading to find out!
Bottom Line Up Front: Overall, Moovly is a pretty impressive web-based video creator. It offers more than most of its competitors (especially at the free level here). Of course, it doesn’t match professional video editing programs, but it’s still an excellent choice for short clip video making and marketing videos.
Who’s Moovly?
For those of you who haven’t heard of Moovly, it’s an online platform where users can create and edit their video content. This solution offers plenty of features, including:
- A selection of editing tools (obviously!)
- Free graphics
- Background music and sounds
- Collaborative sharing features
The beauty of using an online, cloud-based solution is that there’s no need to download anything, which means Moovly won’t take up space on your device.
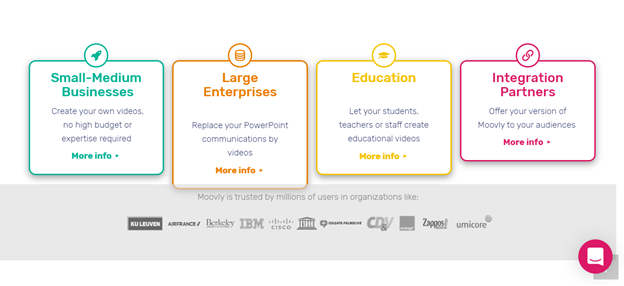
Who Uses Moovly?
On the whole, Moovly’s geared towards producing marketing videos. The kind of content you’d publish on a website, social media networks like Facebook, or training videos you want to distribute internally to your team.
On Moovly’s website, they actually provide a list of the main ways users utilize their platform. They’re as follows:
- Video creation that explains your brand, products or services
- The editing of advertising and promotional content (promo video)
- The generation of training, instructional, or customer-support-style animated videos (explainer video)
But, because Moovly offers users a vast array of features, both students and educators can also make good use of this software.
Do You Need to Create Banner and/or Skyscraper Ads?
If the answer’s yes, you’re in luck.
Moovly provides templates for building both skyscraper and banner ads. These make it easy for brands to create professional-looking ads in next-to-no-time. Gone are the days where you had to waste your precious money and time hiring a graphic designer — you can now easily do this in-house.
Are You a Business Owner?
If you’re an online marketer or an entrepreneur, there’s a good chance you’ll want to amp up your content marketing strategy. This is where infographics come into their own. With Moovly, building infographics is a breeze. You can even create an animated video using Moovly’s pop-up effects. These work wonders for boosting viewer engagement and building a rapport with your audience.
Want to Jazz Up Your PowerPoint Presentations?
If you work in an industry where you have to create a ton of PowerPoint presentations, then you’ll (probably) find yourself frequently searching for ‘how to create better presentations.’ Does that sound familiar?
Again, this is where Moovly comes to the rescue. This solution offers you loads of tools to help you create interactive displays. You’ll enjoy access to all PowerPoint’s regular features, as well as a variety of upgraded apps.
Need to Design E-cards?
With Moovly, you can add plenty of audiovisual elements to your e-cards, making them perfect for publishing on networks like Facebook, Youtube, LinkedIn, etc.
It doesn’t matter whether you’re using e-cards as marketing content or as a way to reach out to clients, Moovly won’t let you down.
Moovly Review: The Advantages
One of the biggest advantages of using Moovly is its simple interface. It won’t take long to get to grips with their dashboard, in next-to-no time, you’ll be using Moovly to the fullest!
Overall, the layout is relatively straightforward. The menus are simple and located precisely where you’d expect them to be, which makes Moovly’s features very easy-to-access. All in all, if you don’t have any experience video editing, never fear, Moovly is suitable for all skill levels.
Plus, there’s a simple tutorial located under the “help” button. If you’re unclear about anything, this is where you should find the answers to your questions.
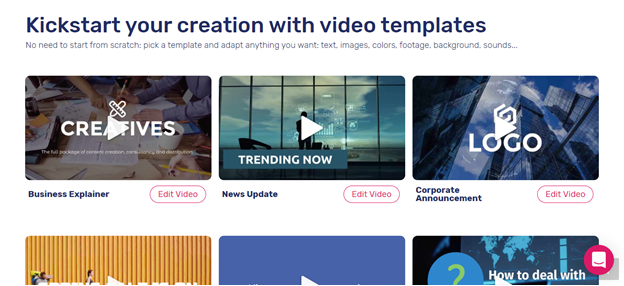
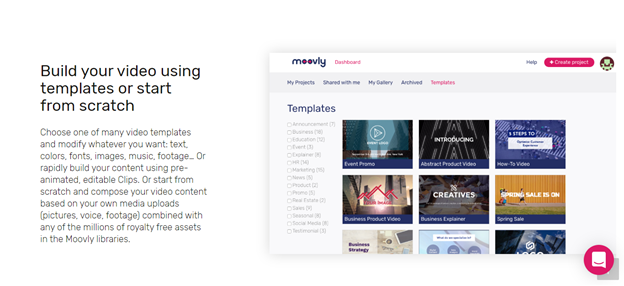
If you don’t want to, you don’t have to start with an entirely blank canvas. Instead, Moovly offers you a small selection of templates to help you kick things off. When you click one, you can preview the video clips. You can also start editing the template immediately. A small sidebar pops up as soon as you want to start making modifications.
This is where you can start adjusting the template’s wording and links, but not its media. This empowers you to see whether the potential template complements the needs of your video. But, to polish your footage thoroughly, you’ll need to open Moovly’s full editor (which is understandable!)
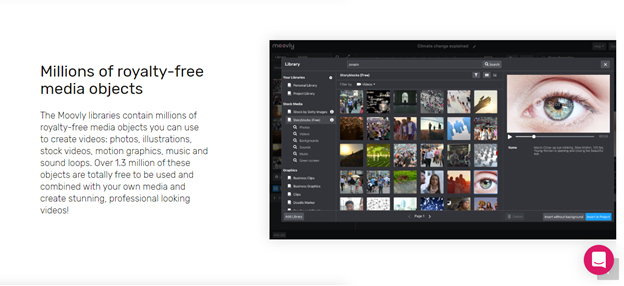
One of Moovly’s more significant perks is the fact they offer a vast library of motion graphics, stock imagery, and videos (all at no further charge). If you’re looking for that ‘something extra’ to enhance the quality of your work, these assets unquestionably come in handy. On the whole, these stock images and videos are pretty good quality. You don’t need us to tell you, this certainly isn’t always the case when it comes to license-free content!
In particular, Moovly’s clipart selection is excellent. Within minutes you can alter the color of these clipart images. When you drop the content onto your canvas, to the right-hand side of the screen, you can click on the “Object Properties” option. This should allow you to edit the color of the image entirely.
In addition to the extensive selection of free images on offer, Moovly is also integrated with Getty Images, where you can pay to use even more high-quality license-free images.
You should note: You have to purchase this content individually, and prices can vary. Be aware, these images remain watermarked until you’ve bought them.
You’ll also be pleased to hear, Moovly’s mobile app is top-notch. From the convenience of your smartphone or tablet, it’s simple for you to view all your videos, share, and upload any work you’ve created directly inside of Moovly, via their app. This is perfect for busy entrepreneurs on the run!
On a separate note, and as we’ve already alluded to, Moovly works seamlessly inside of your internet browser. This is just another fabulous perk to add to the list. It’s no hassle to launch, and don’t worry, this cloud-based solution is totally safe. Moovly’s consistently undergoing virus detection scans from software like Norton safe web, so you can be confident your work and data are safe from hackers.
Moovly Review: The Drawbacks
The most significant disadvantage to Moovly is that in comparison to their competitors, they offer a relatively small selection of video templates (around 50). On top of that, the ones that they do offer are pretty short in length (some as little as 17 seconds). Unfortunately, this library doesn’t look like it gets any bigger for paid users (more on Moovly’s price plans in a sec)
So, on the whole, these templates are useful for providing inspiration…but not much more than that. As a general rule, you’re better off creating your own videos from scratch. It’s also worth noting, most of these templates are best suited for creating video content for Facebook business pages. From what we can see, the majority of these templates boast a more ‘laid-back’ vibe, which doesn’t compliment every niche.
In our opinion, some of the templates seem particularly irrelevant. For instance, there’s one called “Workplace Sexual Harassment.” In reality, who on earth is going to use a 90-second stock video for such a serious topic? Answer: not a reputable brand!
But to be fair to Moovly, some users report these video templates came in handy for helping them learn how to use the program. Also, Moovly’s always adding to their program, so who knows? Perhaps this is something that may change in the near future?
Some users also complain about the cloud interface being a tad slow if your internet speed’s sub-par. If you don’t have a stable internet connection, Moovly isn’t the solution for you. After all, there isn’t an option of purchasing Moovly outrightly to download onto your device.
Last but not least, some users say that when they upload GIFs to Moovly, they showed as still images rather than animation videos — not cool.
How Do You Use Moovly?
Okay, first things first, (and again, as we’ve already said) you’ll need two things to use Moovly:
- An internet connection
- An internet browser
When you open the program, you’ll see a simple dashboard, which is where you’ll manage your projects.
You’ll notice a pink ‘create project’ button. There’s also a menu bar with the following tabs:
- ‘My Projects’
- ‘Shared With Me’
- ‘My Gallery’
- ‘Archived’
- ‘Templates’
Unsurprisingly, this is the button you select when you want to launch a fresh project. This opens a new window inside of Moovly’s video editor.
Now, the first time you launch Moovly, you’ll be asked whether you want to watch a quick intro video on how to use the software. This is definitely worth consuming.
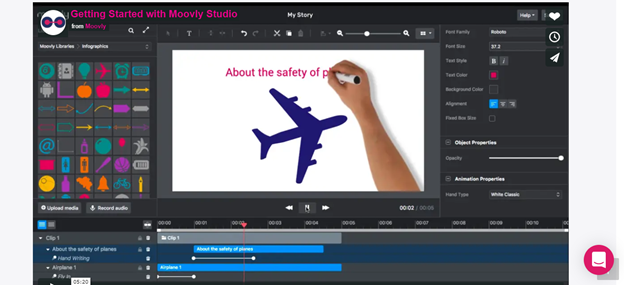
There are a few critical sections inside of Moovly’s editor:
- The toolbar
- The media library
- Properties
- The canvas
- Your timeline.
Okay, now we’ve talked you through the basics, let’s assume you’re now getting to work. At this stage, you’ll have chosen one of Moovly’s templates (if you’re using one), and you’ll have opened Moovly’s full video editor. If so, you should see your video template selected inside of the canvas.
You’ll also see all your assets inside of your timeline. All of Moovly’s templates are straightforward to customize. You can add virtually anything to them to make it your own, including new scenes.
As we’ve already mentioned, Moovly provides a decent-sized library of free assets. To access these goodies, head to the panel on the left-hand side and click ‘Graphics’ then ‘Illustrations.’ You’ll then see several categories to help narrow down your search. With a bit of digging around, you’ll soon find the best image to meet your needs
If you like the look of an asset, you can drag and drop your chosen items onto the canvas (images, audio, animation files, or whatever else you want to use). Then, you can arrange the media along the timeline. To edit an asset, double-click it on the canvas (this should also highlight the asset inside the timeline). This comes in handy for adjusting the timing of your audio and effects to complement your visuals.
To add your own audio to your work, click the “Upload Media” option, and then select and upload the file. Once it’s completed, this should display in your ‘Personal Libraries.’ Moovly allows you to upload files from cloud storage solutions. Most notably, programs like Google Drive and Dropbox.
Once you’re happy with your work, you can export and share your video. If you’ve opted for Moovly’s paid-for version, you can either download your video onto your device or share it online directly from Moovly’s dashboard.
The Properties Panel
Let’s delve a little deeper into Moovly’s properties tab. This is located just above the canvas and where you’ll find a variety of tools to edit your video. We’re going to break a few of them down for you here:
The ‘stage properties’: This permits you to change your default background, aspect ratio, and the mode of your content. i.e., whether it’s a presentation or video. You should note: Free users only get access to the 1:1, 16:9, and 4:3 aspect ratios. But, several mobile formats are available.
The ‘object properties’ tab: This appears whenever you select an asset. Each item has an “opacity” slider. But, images from the stock library also come with a “tint” option to recolor your graphics. Video footage also has a volume feature, so you can set the loudness of your audio to suit your video.
“Text Properties”: As you’ve probably guessed, this tool permits you to change your text’s size, font, formatting, etc.
Most assets also have a “Swap Object” option. Just select the object and then drag the new item you want to use from the asset panel into the ‘swap’ box.’ This comes in handy for trialing a few different things in the same place to see how they compare. You can keep the timeline position and the effects you’re happy with without having to recreate them each time you’re considering a new item.
The Toolbar
There’s a toolbar situated just above the canvas. You’ll use this a lot. So, pay close attention…
Next to the ‘Select’ button, it is the ‘Text’ tool. Unsurprisingly, this is the icon you click on to add new text. Close by is the ‘Mirror’ button. Like a mirror image, this allows you to flip graphics horizontally or vertically. Then to the right of this button, there are ‘Undo’ and ‘Redo’ icons, and of course, the traditional Cut, Copy and Paste options.
You’ll also see a button with two rectangles inside it. This activates when you select more than one object at once. You’ll then have the option of aligning your two items either via their vertical or horizontal center.
There’s also a magnifying glass button, which, yes, you guessed it, permits you to modify the size of the canvas you’re viewing.
Last but not least, there’s a grid button. This populates a grid-type pattern over your video and is especially useful for aligning several objects. You can even set the number of horizontal and vertical lines you have in your grid.
Timeline and Animation (Animated Videos)
The ‘timeline’ is where you can modify both the timing and the appearance of your assets. Each item you work on is assigned its own row on your timeline. You’ll notice the position of its color block matches the timestamp above it and the red marker shows which section of the video is currently being displayed in the canvas.
If you want to add an animation to an object, click the “Add Animation” button. You’ll find this at the bottom of the timeline. You can add a ‘Pause Point’ to pause your content, but this should only be used if you’re using ‘Presentation Mode.’
Once you select ‘add animation,’ you can choose from a variety of entry and exit animation, movement animation, and ‘hand’ animation. The ‘hand animation’ makes your video look like someone’s sketched an image — a bit like a whiteboard video.
Once you’ve successfully added an animation, a small white bar should display beneath the item in your timeline. If you want to modify the animation’s length, you can use this bar to do so.
Saving and Exporting Your Video Content
You’ll be pleased to hear, inside of Moovly’s video editor is an autosave feature. But, you can also manually press “save” as you go along. There’s an icon in the upper-right-hand corner where you can save your work whenever you want.
To export your video, go to Moovly’s main dashboard (back where your projects are listed) Then, you’ll need to scroll to the project you want to export. Here you’ll see three options for:
- Publishing
- Downloading
- Sharing
If you select ‘publish,’ you’ll be able to upload your video directly to the Moovly Gallery, Youtube, or Vimeo. Whereas, the ‘Download’ option is only available to paid users. If you’re a paid user, you’re also able to generate a video file without Moovly’s watermark. This is rendered in HD quality and will download onto whatever device you’re using Moovly on.
Interestingly, the ‘share’ tool is also only available to paid users. This is convenient if you want another editor to collaborate with you on a project. By ‘sharing’ your work, it allows others to view, edit, and copy your video. The best way to describe its functionality is a bit like the share button on Google Docs.
Customer Support and Customer Service
Rest assured, Moovly offers a few customer support channels. For starters, they have a fabulous FAQ section. This resource is brimming with informative videos rather than written instructions, so they’re super clear!
Plus, their Youtube channel “Moovly Academy” includes loads of video tutorials. These are jam-packed full of info on how to use Moovly to its maximum potential.
There’s also a live web chat feature. But this is only active during Central European time. For American users, that’s anywhere between six and eight hours ahead. So, depending on where you’re located, you might struggle to make use of this option. BUT, you can always contact Moovly by email. Response times vary. Generally, the more expensive the plan you’re on, the quicker they’ll get back to you.
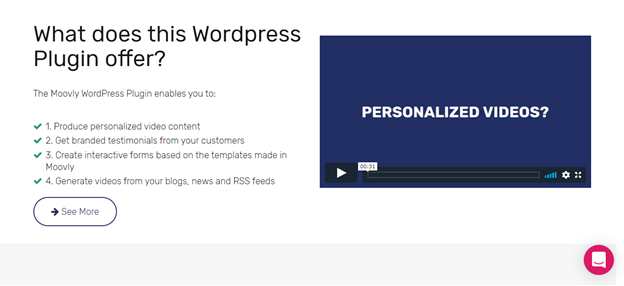
Moovly’s WordPress Plugin
If you use WordPress to run your website, you’ll be pleased to hear that Moovly has a WordPress plugin. Using this extension, you can do all of the following:
- Generate customized video content
- Create branded customer testimonials
- Produce interactive customer forms
- Design videos based on your blog content and RSS feeds
Over on Moovly’s website, they have a video that explains how to install and use Moovly’s WordPress plugin. If you want more info, you can also check out Moovly’s plugin guide or email them on [email protected].
How Much Will Moovly Set You Back?
As video editors that offer free plans go, Moovly is incredibly generous. The only major limitation of their free option is when it comes to downloading your final project to your device. You can’t publish it anywhere without Moovly’s watermark, or in HD.
But on the whole, the tools and resources Moovly provides for free are perfect for anyone getting to grips with the video editing process.
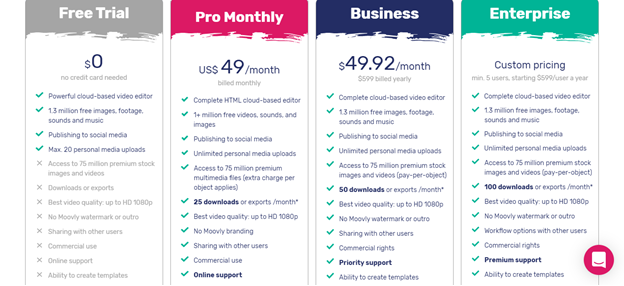
The Free Plan (no credit card needed to register)
Here’s a quick rundown of everything you’ll get:
- A powerful cloud-based video editor
- 1.3 million free images, footage, sounds, and music
- You can publish your work on social media
- A maximum of 20 personal media uploads
If you want to upgrade, there’s the ‘Pro’ plan at $24.92 a month. This is best for small businesses, educators, and teachers. There’s a 30-day trial, so don’t worry too much about parting with your cash. You’ll have plenty of time to try out this program to see whether it meets your needs.
Fun Fact: You can see the number of days left on your free trial in the top right corner every time you log into Moovly’s dashboard.
This trial gives you access to most of Moovly’s features, including the Moovly studio editor tools and Moovly’s shutter stock libraries. You can upload one gigabyte’s worth of content, and you can publish and embed your videos on other web pages.
The Pro Package
One of the most notable perks to Moovly’s ‘Pro’ plan is the ability to mass-produce videos using data in a Google sheet. This permits you to:
- Create videos based on a standard template
- Download your finished work
- Publish your videos on social media
Pro users can generate 25 videos this way. But, if you want to use this video automation solution to create higher volumes, contact Moovly directly, and they’ll sort something out for you.
You’ll also get everything in the free plan, PLUS:
- Unlimited personal media uploads
- Access to 75 million premium stock images and videos (pay-per-object)
- 25 downloads a month
- HD quality, 1080p
- No Moovly watermark or outro
- You can share your work with other users
- Commercial rights
- Online customer support
- Ability to create templates
- Access to Moovly’s Video Production Service (but, an extra charge applies for this)
The Business Plan ($49.92 a month)
You’ll get everything in the previous two plans, as well as:
- 50 downloads or exports a month
- Priority customer support
- Ability to create video templates
- Access to custom fonts and colors
- You can insert closed captions (subtitling)
- Screen recording
- Webcam recording
The Enterprise Plan
This is a custom price-plan for a minimum of five users and starts at $599 per user per year.
This is Moovly’s most expensive package. Unsurprisingly you’ll enjoy everything in the previous plans. But you’ll also get:
- 100 downloads a month
- Workflow options with other users
- Premium level support
- Multiple accounts in one group
- A user management back office
- Floating licenses
- Custom group libraries
- White-labeling options
Moovly Review: Is Moovly Worth Using?
In short, yes.
If you’re looking for a free video editor and video creation tool, Moovly is one of the best in the business. You’ll get access to tons of easy-to-use features that make creating original videos (video making, whiteboard animation videos, and animated sequences) accessible and easy for anyone. Moovly permits you to upload your own content, manipulate your video editing timeline, and access lots of editing tools.
Bottom Line: Overall, Moovly is a pretty impressive web-based video creator. It offers more than most of its competitors (especially at the free level). Of course, it doesn’t match professional video editing programs, but it’s still an excellent choice for short video clip making and marketing videos.
Have you ever used Moovly before? If so, we would love to hear all about your experience. Is there anything you think we’ve left out of this review? Let us know in the comments box below. We’d love to kickstart the conversation with you. Speak soon!
Here are other related video editing software and video creation software articles you may be interested in: