
Last Updated on December 8, 2023 by Ewen Finser
Today, we will be comparing Movavi vs Camtasia. Both of these screen capture software have their advantages and disadvantages.
It doesn’t matter whether you’re a designer, a manager, or an online teacher, capturing audio-visual content from your desktop screen is essential.
This is where screen capture software like Camtasia and Movavi screen capture studio come into their own.
Within seconds you can record whatever’s on your screen, edit your footage, and publish it online.
Bottom Line Up Front: On the whole, Movavi has a slight edge as the more affordable and social media friendly solution. Camtasia us still a great option for more traditional video editing.
Main Differences Between Movavi vs Camtasia
The main differences between Movavi and Camtasia are:
- Movavi allows you to directly share your work on digital platforms likes Facebook and YouTube, whereas Camtasia does not integration with Facebook or YouTube directly
- Camtasia focuses on features like video effects, animations, and transitions, whereas Movavi focuses on 3D video editing, filters, effects, and fades
- Camtasia is much more expensive at $199, whereas Movavi only costs $99.50
Movavi and Camtasia are arguable two of the best screen capture studio and video editing programs on the market. So, this begs the question; which is better?
So, we thought you’d find it useful to explore both these solutions. That way, you can answer this question for yourself. Let’s dive in!
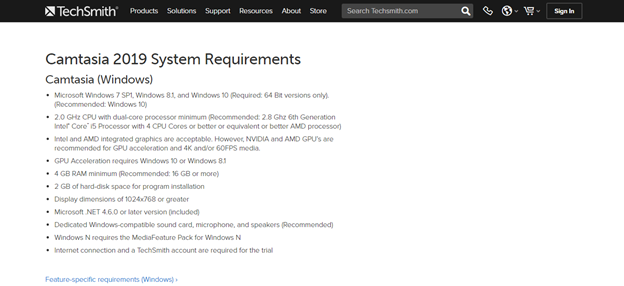
System Requirements
Okay, let’s start by comparing the system requirements necessary for both Camtasia and Movavi to operate.
If you’re installing Movavi onto a laptop or desktop, you’ll need a Windows XP, Vista, or Windows 8. By now, we’re pretty sure you have that! You’ll also need at least a 1GHz AMD or an Intel processor.
Top Tip: If you want to enjoy Movavi’s functionality to the fullest, you’ll need Intel’s multi-core processor. For instance, the i7.
Why?
Well, Movavi can speed up its video recording speeds by utilizing each core.
In addition to all the above, you’ll also need a minimum of 32-bit colour and1024 x 768 resolution display. That’s as well as 50 MB worth of hard disc space.
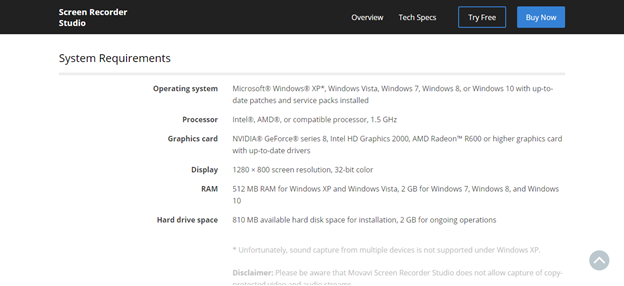
So, what about Camtasia? Camtasia doesn’t have as many system requirements. As such, this program is easier to get up and running with. For instance, you only need 30MB of free space on your hard drive. Plus, Camtasia is compatible with every version of Windows since Windows 98.
So, it’s practically a given you’ll be able to use this program — you certainly don’t need the latest tech to use Camtasia!
But, it’s worth noting, you’ll need at least a 500MHz processor and 64 MB of RAM…that’s if you want Camtasia to run smoothly.
In short, if your computer has a low system configuration, you won’t be able to use Camtasia. Users report that even with an i3 processor and 4GB worth of RAM, Camtasia took forever to open and render their videos. Even the video previews lagged! Whereas, when they used Movavi, the program worked fine.
The key takeaway: If you don’t boast a powerful machine, Movavi is a better choice than Camtasia.
Movavi vs Camtasia: How Do I Use Movavi?
Movavi’s user interface is very straightforward. From your main dashboard you’ll see options for:
- Capturing
- Audio
- Effects
- Tools
- Screencast
- Help
You can use your select button to highlight the area of your screen you want to capture. Then, when you’re ready, use the ‘Rec’ button to start recording your visual content.
On the whole, both Movavi’s and Camtasia’s interfaces are functional. By this, we mean, both their features and icons are situated where you would expect them to be. They’re effortless to reach, there’s no hunting around the dashboard!
But, on the whole, Movavi is slightly easier to use from the get-go than the Camtasia video editor.
Why?
Well, Movavi’s icons on their dashboard are both easy to identify AND large — so you can’t miss them!
Whereas, taking a Camtasia tutorial is usually advisable. This works wonders for getting your head around how to navigate this software. The symbols on Camtasia’s user interface are much smaller. But, this is namely because Camtasia has more to offer in terms of functionality, so they literally can’t increase the size of the icons. There’s no space! So, it’s swings and roundabouts really.
But, other than that, the interfaces are much the same.
How Do I Use Camtasia?
Just like Movavi, Camtasia’s interface is very well designed. But as we’ve just said, its interface is slightly more complicated. This is especially true if you don’t have any experience using screen capture software. But, if you take the time to get to grips with it, you’ll pick it up relatively quickly. It might just take a tad longer than Movavi.
From Camtasia’s central dashboard, you’ll see options for a:
- Recorder
- Camtasia Producer
- Camtasia Player
- A variety of editing options
Everything you need is conveniently located in one place.
Screen Capturing Features
FULL DISCLAIMER: Both Camtasia and Movavi are robust screen capturing tools. Period.
It’s also worth noting, both programs allow users to set the parameters of their screen capturing. That way, you’ll always meet your exact screen capturing needs. For instance, you can set both the resolution and the size of the area you’d like to record.
All in all, it’s a tie.
Still Frames
With Movavi, it’s effortless to capture a still frame. From your ‘capture area’ just select one of the following three settings:
- Full Screen
- Widescreen
- Customized options
Just to name a few. Drag the rectangle with your mouse and pull it over the part of the screen you want to capture. When you’re ready, you can create the still frame just by clicking the capture button.
Capturing still images on Camtasia is a pretty similar process. So again, when it comes to taking still shots, they’re both as good as each other!
Video Capture
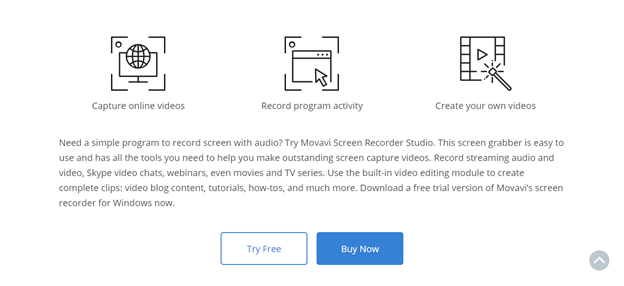
Okay, let’s talk about video capture (the feature that probably matters most to you!). With Movavi, there are three different options for capturing video on your screen:
- Capture Screencast
- Capture Game
- Capture Online Video
From your Movavi dashboard, head to the ‘Screencast’ drop-down menu to find these options. When you’re ready, click the ‘Select’ button inside the Capture area and highlight the section of your screen you want to record.
Fun Fact: ‘Game Mode’ is always full screen. So, there’s no ‘Select’ button for you to use. To record audio, click the audio checkbox and select your recording source. When you’re happy with the settings, press the ‘Rec’ button.
You can record the screen of your laptop and desktop in high quality,1080p Full-HD at 60 frames per second. As we’ve already mentioned, the screen recorder allows you to capture either part of the screen or all of it. That’s all the while audio runs through your device, webcam, and/or microphone at the same time.
Movavi’s recorder also comes with a scheduler. So, you can set a time for your recording to start and stop. You don’t even have to be in the same room as your device!
We want to make it clear that Movavi Video Suite comprises of three different tools:
- A video editor
- A video converter
- A screen recorder
All of which we’ll talk about in this review. But for now, we’re just focusing on the ‘screen recorder’ tool.
What about capturing video with Camtasia?
On the whole, it’s a very similar process. But, unlike Movavi, who creates MREC files, Camtasia always produces AVI files. This is what gives users the option of uploading their work directly onto video sharing platforms and other social media networks.
To start a screen recording on Camstia, select the ‘tools’ menu on your Camstia dashboard, and choose ‘Camtasia Recorder.’ You can modify the ‘Set Capture/Input’ to suit what’s needed. It’s at this point you’re able to select the area of your computer screen that you want to record. Or, you can opt to capture the whole screen — it’s entirely up to you. To set the parameters of your recording, just use the selection tool to highlight the part of the screen you want to record.
You’ll be pleased to hear, you can even record several windows at once. This permits you to capture virtually any kind of desktop activity. You can also lock your recording to a particular application. That way, if your app moves, the recording will follow it accordingly. Needless to say, this works wonders for creating comprehensive and informative tutorials.
You can also utilize Camtasia’s ScreenPad menu. This is where users can add visual effects to your work while you’re recording. How cool is that?!
Camtasia makes it easy to record your screen (or webcam footage) while simultaneously capturing your system’s audio, microphone audio, or webcam’s sound.
For your ease, all these inputs are placed along different tracks. This makes it far more straightforward for you to edit.
Interestingly, Camstia’s screen recorder supports two formats:
- TREC, TechSmith’s own format (the creators of Camstia)
- AVI
If you opt to record in AVI mode, you can’t capture both webcam visuals AND your system’s audio at the same time. But, you CAN record the visuals on your screen AND the sound from a mic, simultaneously.
If you want to record using all of Camtasia’s available inputs, then you’ll need to opt for the TREC format. Then, once you’ve finished recording, you can use the Camstia Editor to convert your work into your desired file type.
Capturing Audio
As we’ve already alluded to both Camtasia and Movavi, provide you with audio recording features.
With regards to Camtasia, users have the option of using either a built-in microphone or their own external mic (this is recommended as it (should) increase the quality of the audio).
To create an audio file, you’ll need to open Camtasia’s audio editor. You’ll then need to select the option that says ‘Create a New Audio File,’ then when you’re ready, hit record. It almost goes without saying, Camtasia will continue to record until you press the stop button.
In Movavi, it’s also pretty simple to record audio content. Just click ‘Capture Audio’ and then select the device you’d like to use to take the recording. Then again, when you’re ready, just hit ‘Record.’ When you’ve finished recording, the audio file should automatically open in Movavi’s video editor.
With either solution, you can easily enable and disable webcam, system audio, and mic audio. This process is pretty simple, so don’t worry about that.
Movavi vs Camtasia: Editing Features (Audio and Video)
Okay, now you’ve made your recording, it’s time to get editing. So, what do both these tools have on offer?
Well, for starters, both Movavi and Camtasia have built-in video editors attached to them. You don’t have to purchase separate software to do your editing. Yay!
As you may have already guessed, Movavi’s audio and video editing features are (on the whole) equally robust. But, Camtasia’s video editor is a tad more sophisticated than Movavi’s.
Let’s take a look at Camtasia first…
Camtasia provides you with all the tools you need to trim your video clips and do colour corrections. Any editing you do in Camtasia is completed via their ‘producer’ feature. This is where you’ll find Camtasia’s vast range of video and audio editing options.
There are several effects, transitions, titles, callouts, and annotations for you to choose from. Adding these features to your video is a breeze, and they work wonders for boosting viewer engagement — win-win!
Not to mention, you can also zoom in and out, pan, and animate your videos. There’s also a library brimming with royalty-free music and themes that help provide your video with a structure that flows. Just drag and drop the media you want to use in your timeline, and you’re good to go.
Speaking of Camtasia’s timeline, this boasts a selection tool. You can use this to select a part of your footage and then cut and/or copy it.
While you’re editing, you can easily add voice narration to accompany your video. Plus, you can also add content from your webcam to the project you’re currently editing. On a similar note, let’s talk about Camtasia’s audio editor for a sec. You can adjust the volume of your audio and remove noises. You can even opt to fade in and out your audio or silence the sound altogether — neat, right?
Back to Camstasia’s visual video editing features. This solution has tons more advanced tools on offer. For instance:
- You can scale your video
- Change its opacity
- Rotate your footage
- Add visual effects
- Add animation to either your video or image.
- Insert captions to your video
But, the most exciting feature Camtasia studio has to offer is its quiz tool. Yes, you read correctly. You can launch a quiz right in the middle of your video. How awesome is that?! This takes viewer engagement to a whole new level.
So, if you want to ask viewers a question or test your students during your video, this is the tool to use. Your audience can then respond to you with their answers via email.
Top Tip: To utilize the quiz feature, you’ll need to use output with a smart player option.
This tool allows you to ask all kinds of different questions:
- Multiple-choice
- ‘Fill in the blanks’
- Short answers
- Long answers
- True or false
When it’s time for the quiz to pop up, the video gets paused. It’s at this point users can submit their answers.
What about Movavi?
Similarly, Movavi’s video editor allows you to cut and merge clips, add filters, transitions, titles, and special effects like slow motion, reverse, chroma key, etc. That’s all in addition to a range of after-effects.
It’s also easy for you to stabilize your video, trim, rotate, and add captions. You can also edit the media volume and reduce the size of the media to make it mobile-friendly.
You’ll be pleased to hear, there’s also a collection of intro and outro slides to choose from and add to your videos.
There are plenty of tracks on your editing timeline for you to add audio, video, text, etc. This comes in handy for keeping editing as simple as possible. You can also add extra tracks if you need them AND link them. This is especially useful for keeping your audio and video clips in sync with one another as you edit your work.
Movavi vs Camtasia: Movavi Exporting Feature
As we’ve already mentioned, with Movavi, you have to go to the effort of exporting your work and converting it to your required file type.
You can save your video in any of these formats (there are loads more, but here’s a small sample):
- MP4
- MOV
- AVI
- MKV
- MOV
- GIF
- PNG
- JPG
- BMP
- MP3
Movavi video converter boasts a three-step conversion process:
- Add the media you want to convert
- Choose your desired file format (there are more than 180 to pick from!)
- Click on the ‘Convert’ button.
Both Camtasia and Movavi support a plethora of video and audio formats. As such, you’ll always be able to use the best possible file type to suit your needs.
Conversion Speed and Quality
To help get a better feel for the conversion speed and quality of both Movavi and Camtasia, I scoured the internet for reviews. I came across one user who reported that they took a 14.2 MB (resolution 1280 x 720) MP4 file, and converted it to WMV without changing anything.
This is what they found:
- Camtasia took one minute and 58 seconds to save the file.
- Movavi took one minute and 54 seconds.
As you can see, there isn’t much in it! However, this same user reports that Movavi’s conversion produced an ever-so-slight reduction in quality. Whereas, Camtasia’s finished product was outstanding. But, on the whole, the differences in both speed and quality are next-to negligible.
Movavi vs Camtasia: Who Uses These Solutions?
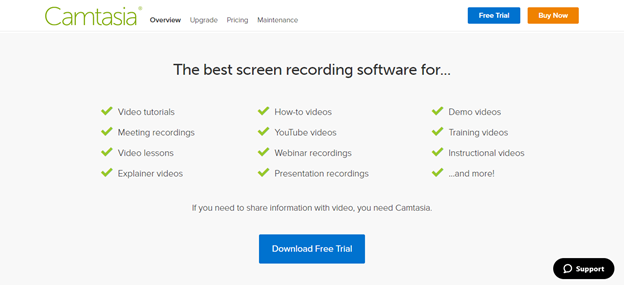
I did a bit of digging to find the kinds of people who use these programs. According to Camtasia’s website, over 24 million people use this solution to create their videos. That’s pretty impressive!
On the whole, their customers use their tools to create the following kinds of content:
- Video tutorials and how-to videos
- Demo videos
- Recordings of meetings and events
- YouTube videos
- Employee training videos
- Video lessons
- Webinar and presentation recordings
But most impressively, Camtasia is used by some of the top companies and universities in the world, including the American Cancer Society, eBay, and Boise State University. If that doesn’t scream credibility, I don’t know what does.
I tried to find similar info on Movavi, but unfortunately, I couldn’t find anything.
Movavi vs Camtasia: How Much will Movavi and Camtasia Set Me Back?
Now, we’ve conducted a thorough comparison of both Movavi’s and Camatasia’s features and functionality, let’s take a look at their pricing:
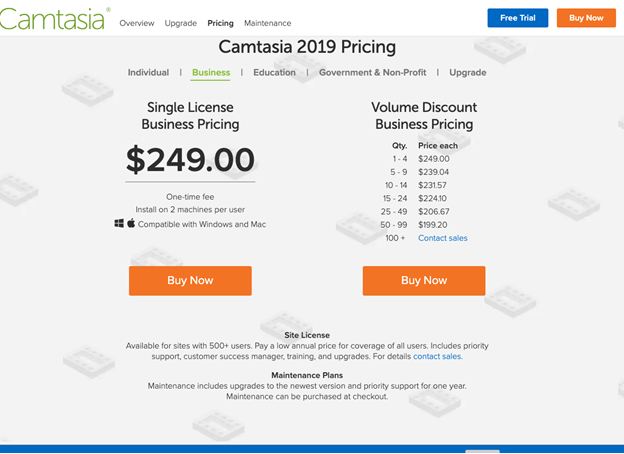
Camtasia
For Camtasia’s ‘individual’ package, you’ll have to pay a one-time fee of $249. You can install this program on either a Windows or Mac computer and can download it onto two machines.
The same deal is available for business owners in need of a single license. However, there are loads of volume discounts on offer if you need to install Camtasia on more than two machines.
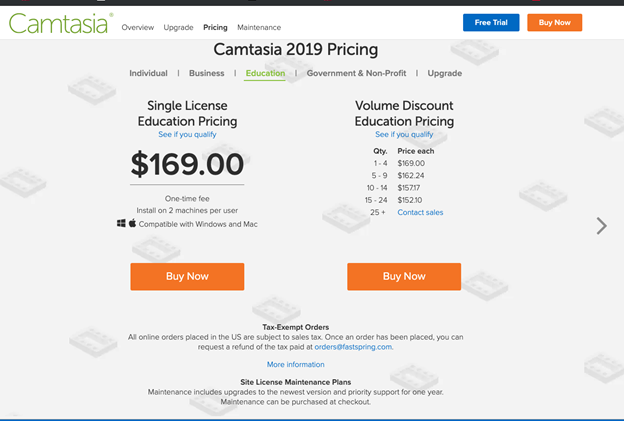
If you’re a student, you’re in luck. You can purchase Camtasia for a cheaper one-off fee at $169. Again, this is compatible with both Mac and Windows devices, and you can install the program on a maximum of two machines.
The same deal is also available to government departments. And again, just like the business package, if you need to install Camtasia onto more than two machines, there are plenty of volume discounts available.
But it’s worth noting, you have to pay for future upgrades. So, be sure to factor that into your budget.
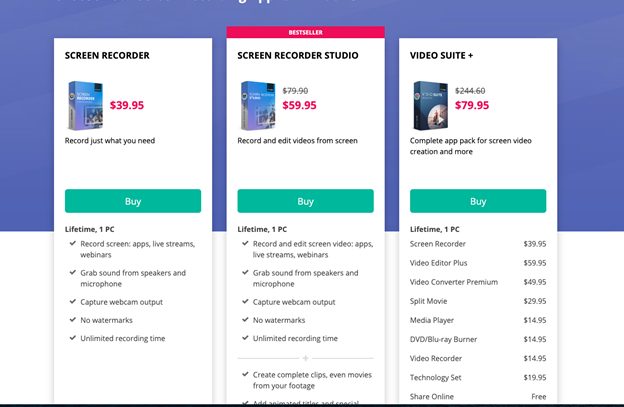
Movavi Screen Recorder and Video Editing Software
Movavi offers two Movavi screen screen capture studio packages that may be of interest to you.
The first is the ‘Screen Recording Software’ option. This is a one-time purchase of $39.95. You can install this on just one machine, but you’re entitled to the following perks:
- You can record your laptop or PC screen: apps, live streams, webinars, etc.
- You can grab audio from both your speakers and microphone
- You can capture webcam output
- No watermarks
- Unlimited recording time
Or there’s the ‘Screen Recorder Studio’ option ( similar to Camtasia Studio). This will set you back a one-off $59.95 payment. You’ll get everything in the previous bundle (Movavi screen capture studio), as well as being able to:
- Create complete clips, even movies
- Add animated titles
- Insert special effects
- Share videos on YouTube
- Optimize clips for smartphone viewers
- Optimize clips for TV viewing
Movavi vs Camtasia: Which Should I Go For?
Like any kind of software, Movavi and Camtasia Studio have both its advantages and disadvantages.
But, in a nutshell, Movavi is much cheaper. Plus, you can share videos online directly from Movavi’s editor to your social media network.
Whereas Camtasia is pricier. Plus, users report that Camtasia’s video and the audio syncing feature could be better. Also, you have to go to more trouble to upload work onto online networks
Bottom Line: On the whole, Movavi has a slight edge as the more affordable and social media friendly solution (and GREAT Camtasia alternative). Camtasia us still a great option for more traditional video editing.
Have you used either Movavi or Camtasia before? If so, we would love to hear how you found these screen capturing solutions in the comments box below. Speak soon!
Here are some other articles you may be interested in: